Sunday, November 20, 2011

Effecting Change in Science

Check out 14 scary stats on the STEM gap at
http://www.onlinecollegecourses.com/2011/06/26/14-scary-stats-on-the-stem-gap/

Being a teacher without a classroom and even without a district right now has made it difficult to create change in science instruction.  For now the best that I can hope to do is to share what I have learned with other teachers like we did in this week’s application assignment with sharing the instructional plan.  That experience has shown me that I can create change on the small scale and maybe the changes I make will allow other teachers to create change on a larger scale within their schools and the districts they are in. 

The next step for me would be to share the information I found on inequality this week regarding females, minorities, students with disabilities, and the gifted& talented in order to increase their exposure and the opportunities they have within science.

Sunday, November 13, 2011

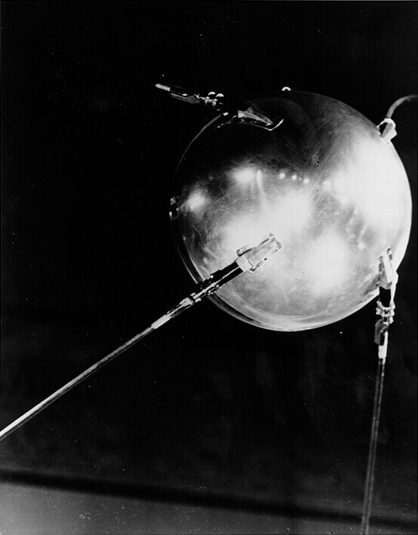
Is China's technological innovation our new Sputnik?

On October 4, 1947 the Soviet Union launched an artificial satellite called Sputnik, beginning a new age of technological and scientific innovation.  When the United States was precluded into outer space, it pushed our government to approve funding for further advancements in launching our own satellite Explorer I.  Explorer 1 was a scientifically significant satellite that upon its launch “discovered the magnetic radiation belts around the Earth” (NASA, 2007).  Even more importantly, the launch of Sputnik was directly responsible for the creation of the National Aeronautics and Space Administration (NASA) as we focused on the competition between our nations and the new space frontier.

We are faced again with the battle into a new frontier; this time the scientifically technological world we all now live in right here on Earth.  Arne Duncan, U.S. Secretary of Education, recently said “The country that out-educates us will out-compete us” (Koebler, 2011).  This is already being done when we learn that “Many American companies have asked for an increase in the number of skilled foreign nationals they can bring into the country and have outsourced other jobs to countries such as India and China” (Koebler, 2011). 

In order to be competitive, we need to do what other countries are doing by making sure our teachers are highly qualified in the subjects they teach and using the tools of our future, technology.  When the United Kingdom had a teacher shortage they provided special stipends and signing bonuses in order to get teachers in the math and science fields.  “The technological evolution has spread everywhere in America…everywhere except our schools” (Koebler, 2011).  There is something wrong with that.  How can we teach students to survive in a technological world if we don’t teach them using those technology tools?

In What’s our Sputnik?, Friedman shares that “China’s rise [is]…the 21st-century equivalent of Russia launching the Sputnik satellite – a challenge to which we responded with a huge national effort that revived our education, infrastructure and science and propelled us for 50 years” (2010).  I agree with Friedman.  When it comes to our innovative world, we are not leading the pact and it comes back to our need to educate and increase interest in science. 


Resources:

Friedman, T. L. (2010, January 17). What’s our Sputnik? [Op-Ed]. The New York Times [Late Edition (East Coast)], p. WK.8. 

Koebler, J. (2011, November 10). Duncan: Countries That Out-educate Us Will Out-compete Us.  US News.  Retrieved November 13, 2011 from http://www.usnews.com/news/blogs/stem-education/2011/11/10/duncan-countries-that-out-educate-us-will-out-compete-us

National Aeronautics and Space Administration (2007).  Sputnik and the Dawn of the Space Age.  Retrieved November 13, 2011 from http://history.nasa.gov/sputnik/

Sunday, July 31, 2011

Modeling Watersheds

I really enjoyed implementing the Earth science model lesson plan for this week.  Working with students who are genuinely interested in learning science, so much so that they are willing to take time out of playing their video games and riding their bikes during summer vacation, was more like playing then working.  That is what teaching should be, enjoyable. 

I think one of the best parts about using a model with this experience was in allowing the students to create the model themselves.  They had such a great time balling up the foil and using wet newspaper strips to create a landscape.  They had even more fun figuring out where the lows and highs were and where they think the water would flow.  And of course the most fun of it all was actually spraying the colored water and turning their hands into Smurf models when the blue dye got on them. 

Using this model however did have some pitfalls.  In the future I would use actual rocks rather than balled up newspaper and foil in order to get a more natural result.  I would also have students create the landscapes ahead of time and let them dry instead of doing a fast model.  And last, I would remember to not put as much blue dye in the water as MY fingers also turned Smurf blue.

In the end, models are important scientific tools and are highly beneficial when used within the classroom.  I can’t imagine teaching science without them.

Tuesday, July 19, 2011

Natural Disaster Education in Compassion

A few years ago, during my student teaching experience, I showed students a video of the tsunami that hit Thailand in 2004.  They were stunned to watch as the waves crested onto shore and overran the homes and people sitting on the beaches enjoying their vacations.  It is by watching these natural disasters that students understand them not just in a detached way but on a personal level, learning that the people affected could just as easily be them. 

Within the classroom there are many options available for teaching students to appreciate that humanitarian cause of a natural disaster.  If a natural disaster is occurring at the time of instruction then this is so much more powerful.  They can see how horrible the results can be.  And they can see the story developing and learn as the numbers of casualties, injuries, and costs to repair just keep increasing.  If students are learning about natural disasters without one currently occurring then the first thing I would do is have them read the accounts of a natural disaster.  A creative way to do this would be to take the stories of the people involved in the Great San Francisco earthquake of 1906.  This information can be obtained through sites such as Eyewitness to History (http://www.eyewitnesstohistory.com/sfeq.htm) which provides stories from those that were there.  Through reading these stories, acting them out as if they were the people involved, they will learn the heartache of the devastation. 

To learn about organizations that help the people involved in a natural disaster, I believe that having students work together in cooperative groups to research an organization and then sharing it with the class provides the greatest learning opportunity.  This allows students to find information that is pertinent but also they are able to determine what is most important to them and what affects them most. 

In times of natural disaster schools should band together to help in any way that they can.  I have experienced before having the staff at our middle school compete against the different grade levels in a penny drive.  My favorite part of this was when the different groups brought in quarters, dimes, nickels, and even dollars which they would put into the jars of the other teams which incurred a penalty.  It was a lot of fun, but most importantly it raised money to help people in need.  Every method to get students interested in helping others is open as an option. 

Saturday, May 21, 2011

Ask a Scientist: Cloning

At this time I have not recieved a response from the Ask a Scientist website. Once a response has been received I will update this post.

Sunday, May 8, 2011

Presentation Program Previews

This week I had the opportunity to preview two different presentation software programs available on the web.  Below are my reviews of those programs:

Google Docs:

Ease of use – Very similar to PowerPoint and its well-known format. This makes it simple for those that already know the program.
Special features – Multiple people can see the same document from different locations and can submit changes as well.

Reliability – Google is a reliable tool used by many all over the world, so I see no reason that this form of Google would be any different.

Learning curve/availability of training materials (e.g. tutorials) – Tutorials are available before use.
Equipment/technical requirements – An internet connection and web browsing tool are the only needed technical requirements.

Potential for collaboration and file sharing – As stated under the special features, collaboration is allowed in this program.

Cost of use – FREE!

Accessibility from home, school, or classroom – The program is web-based and usable anywhere a web connection is available.

Multi-media capabilities (such as animation, sound, video elements) – Video elements are able to be included in the program.  However the one drawback that I see of this program is it does not allow animations, specifically between slides during the  presentation.

Engagement/motivational factors – The program is very basic in its visual appeal.  There are not engagement/motivational factors to this program.


Museum Box:

Ease of use – Easy to use with a lot of options.

Special features – The program allows you to create images on the sides of boxes, creating a presentation from those boxes.

Reliability – The site seems pretty reliable, except for down time for scheduled maintenance.

Learning curve/availability of training materials (e.g. tutorials) – The site provides an introduction video, links to others projects for inspiration, and a help button for all of
the tools.

Equipment/technical requirements – An internet connection and web browsing tool are the only needed technical requirements.

Potential for collaboration and file sharing – The file is sharable on the site.  However, there is no collaboration available.

Cost of use – FREE!

Accessibility from home, school, or classroom - The program is web-based and usable anywhere a web connection is available.

Multi-media capabilities (such as animation, sound, video elements) – Videos, links, and image capabilities are available. However, animations are not.

Engagement/motivational factors – It is really cool to see the boxes sides, and see the animations as they flip from one to another.  The engagement is great with this program.


After having taken a close look at these two programs, I probably would not use either one for this project.  Though they allow you to create slides, neither seems to have very engaging options for actually doing a presentation. This includes no options for animations or slide transformations.  I am still interested in checking out the Prezi presentation software, but if it falls between either of these and PowerPoint, I would choose to use PowerPoint.

Monday, February 14, 2011

21st-Century Topics and Tools


To get students interested in Chemistry is not always an easy task.  Especially after they hear from their parents or peers about how difficult it can be. Therefore it is important that we teach students that Chemistry can be a fun topic to learn about and that it is important to know more about it as it surrounds us everywhere

Websites:
The most informative site I found for assisting students with learning about the periodic table and its elements.    This site allows students to look up the elements via many different methods, including crystal structures, orbital properties, atom & ion sizes, isotopes, and many more.


This site is perfect for inspiring those students that are comic book lovers.  It includes links to every element on the periodic table and its location within comic books.  It also includes actual copies of the comic books where the element is mentioned.
 
This page of the Learning Science website is full of great interaction applets and other programs for teaching students chemistry through interactive technology.   Students will have a great time playing around with the science tools, and learning a lot at the same time.

And lastly this site is for middle school teachers, though some might be useful for younger or older grades as well.  It has a lot of links to chemistry and other science related content.  One that might be particularly useful is the link to the periodic table elements videos.
 
Usage in the classroom:
When students use these websites, their links, or their programs students will be able to capture the enthusiasm for Chemistry that we teachers have when teaching It to them.  They will learn a lot of useful information while also learning how to use technological tools. 

One possible lesson that could be taught through the use of the WebElements site is to have students create a PowerPoint presentation that centers on a specific group of elements or specific characteristics of elements.  Students would also be required to create a creative representation of the information they learn.  Options could include artistic visuals, songs, plays, etc.  When using WebElements, students will become interested in how they can link to all of the different aspects of the elements as well as become interested in the creative aspects of the project. 

The only issue with the WebElements website is it could be confusing to students without some instruction on how to use it.  Therefore, this project would likely take a few days to complete. 

Sunday, January 30, 2011

The Heat Is On!

In order to investigate the heat retention ability of water with different heat insulating materials, this experiment measured the temperatuere of a cup of water after thirty minutes of insulation.

The following materials were used:
Paper Towel - chosen for its likely non-insualting ability.
Plastic Wrap - chosen for its ability to lock out air.
Craft Fleece - chosen for its air spaces that make it hard for molecule vibrations to move through as a solid surface would.
Aluminum Foil - chosen for its normal heat encapsulating ability which is used in cooking.

Hypothesis: The craft fleece will be the best insulator due to the varied airy spaces and the plastic wrap will be the least isnulating due to its thin solid structure.


The original temperature of one cup of water when placed in a coffee cup measured at 99.9°C.  After thirty minutes the water temperature was measured and the results were surprising.  The paper towel showed to have let the most heat escape with a resulting temperature of 62.6 °C.  The next least insulating material was actually the craft fleece, with a final of 64.3°C of heat remaining in the cup.  Next with 65.0°C, was aluminum foil, which was not very surprising as it is often used in cooking to trap in heat.  The final item which was unexpected was the plastic wrap, maintaining the highest temperature of water at 65.5°C. 


Tiller, Enger, & Ross (2008) explain that “the best insulator is a vacuum, since there are no molecules to pass on the vibrating motion” (p. 86).  In this case, the plastic wrap sunk down into the cup, forming a vacuum, creating the best insulation and keeping in the most heat.  

In order to do this experiment in the classroom, a few things would need to be changed in order to keep safe experimental procedures in place. For instance I would not use glass cups as they are too likely to get broken.  I also would provide other thermometers that are also not breakable, such as the one I used which is meant for cooking purposes.  This thermometer was digital which also allowed for more accurate measurements.  Another change I would make is to start with water that is at a much lower temperature to protect the students from burns.

I think that students could really get engaged in this experiment if they were able to bring the items in from home to use as insulating materials.  I would be excited to see what they think could be great insulators and to see how they actually work.  I also think students could get into this if the measurements were taken more often, such as every 5 minutes rather than after 30.  If students did this, they could create line graphs of the data which would allow them to work on those necessary graphing skills.

To make this relevant for students and their lives, we could discuss how insulation works in their homes, how it costs their families money when heat escapes.   Also, we could discuss how it may affect their hot chocolate, coffee, or hot apple cider, then share those as a class after the experiment was complete.

In the end I think that with some changes this could be a valuable lesson in the classroom.  And it continues to fight the environmental fight that I so highly value teaching our students about.

Sunday, January 16, 2011

ENGAGING IN GUIDED INQUIRY

Unit Question:  What is the effect of large objects colliding with smaller objects?


Method. Move the objects as described in each hypothesis.  Repeat the process three times per scenario.

Question 1: What happens when a small toy car is crashed into a large toy car at rest? 

Hypothesis: When a larger object is at rest and is acted upon by a smaller object, the larger object will move backwards, while the smaller object moves in the opposite direction at a slower velocity.

Results: The small train stopped its forward motion and moved backwards slightly, while the large dump truck moved backwards at a much slower rate than the small train had hit it with. 

Question 2: What happens when a large toy car is crashed into a small toy car at rest?

Hypothesis: When a smaller object is at rest and is acted upon by a larger object, both the larger and smaller objects will continue on in the same direction but at a slower velocity.

Results:  The large dump truck continued to move forward though at a slower velocity, while the small train moved along backwards in front of the large dump truck.

Question 3: What happens when two vehicles, one large and one small, move towards each other at the same velocity?

Hypothesis:  When a large and a small object connect at the same velocity, the two objects will move in opposite directions.

Results: The results varied depending on the velocity of the vehicles. If the vehicles moved at a high velocity towards each other, then the small train moved off to the side and the large dump truck continued forward at a slightly lowered velocity.  If they moved at a slower velocity towards each other, then the small train was moved along with the large dump truck as in question two. 

Observations:

In order to get a different result I would find two objects that have closer mass in order to get less extreme results.

If I were to use this experiment in my class, I would provide students with a large variety of vehicles or objects to choose from.  One option for an extension would be to take two of the same remote control vehicles and add mass to one and see what happens when you crash the two together at the same velocity. I think students would really be engaged by this and if they knew that this was a culminating activity it would get them very involved in the investigation as well.  As I teach teenage students that will one day soon have a license and be driving on the roads, this investigation applies to what they would soon be experiencing and might even make a difference in how they drive, producing safer drivers.

In the end, the students would learn about Newton’s three laws of motion, Momentum and the law of conservation.  And I believe that this investigation would let them have a hands on experience with these scientific concepts, and they would be able to apply them to their lives and to their futures in science.